Howto: set up your ESPRESSObin as a home router

Take the following steps:
- Decide whether to use a SATA disk or not
- Procure a the parts you need
- Install an operating system
- Configure networking
We will be discussing these steps in turn.
Decide whether to use a SATA disk or not
The ESPRESSOBin board does not come with on-board persistent memory, but it gives you several options:
- Use an SD Card
- Pro:
- Easy to do
- Con:
- SD Cards are slow and unreliable for data storage
- Pro:
- Use eMMC: this is a theoretical option at this time, because the ESPRESSObin is not currently sold with eMMC, although the board is ready for it
- Use an external USB disk
- Pro:
- Wide range of storage capacities are available
- Con:
- Extra cabling that needs to be managed
- More complex setup
- Still need to boot from unreliable SD Card
- Pro:
- Use a hard disk or solid state disk via the ESPRESSObin’s SATA connector. Almost
all of today’s (internal) hard disks have a SATA interface
- Pro:
- Reliable
- Wide range of storage capacities are available
- The ESPRESSObin board has the same size as a 2.5in notebook drive
- Con:
- More expensive
- (Somewhat) more complex to setup
- Needs an enclosure
- Pro:
If you only want to use the ESPRESSObin as a router, an SD Card might be sufficient. If you want to use the ESPRESSObin as a home server and run apps, we recommend a SATA drive.
Procure a the parts you need
If you intend to use a SATA drive, you find a 3D-printable enclosure that also takes a disk and a fan at Thingiverse.
If you do not intend to use a SATA drive, you can still use the above enclosure. There is also an STL file provided by the vendor (although it does not appear to be designed for 3D printing).
Required parts:
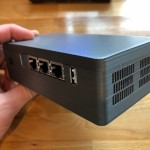
- An ESPRESSObin board. Depending on RAM, Globalscale will sell it to you for $49 to $79.
- A 12V power supply for the ESPRESSObin board. Gobalscale has it at $10 (same URL)
- If you decide to use a SATA disk:
- A 2.5 inch (“notebook”) SATA hard disk or solid state disk. You can find many different choices on sites such as Amazon, Newegg or stores such as Fry’s or Microcenter. Solid state disks are more expensive, but generally faster. Choose a size that you think you won’t grow out of in the next year or two. They generally start at about $29.
- A short SATA cable. Some disks come with cables, but because there isn’t a lot of room in the enclosure, a short 4 inch one like this one is recommended.
- This item is the only hacky part of the project. Globalscale, for whatever reason, used what I would consider the “wrong” power connector for their board, and so you need to piece together a SATA power cord that is SATA female on one end, and MOLEX female on the other.
- An erasable SD Card with at least 4G of space. If you decide in favor of the SATA drive, you only need it for setup.
- A 3D printer, or a friend with a 3D printer, or have commercial service print the enclosure for you.
- Some M3 screws:
- 4 M3x12 self-cutting screws for holding the two halves of the enclosure together
- 4 M3x6 regular screws for attaching the disk (if you use it)
- 4 M3x6 self-cutting screws for attaching the board to the enclosure
Optional 1: add a fan (no soldering required)
- A 25mm x 10mm fan for the enclosure, which can keep your ESPRESSObin and the disk cool so they won’t crash
- A 0.1in male header with two pins
Optional 2: add WiFi and Bluetooth (no soldering required)
- A WiFi card for the ESPRESSObin. Globalscale has one that speaks 809.11ac (the latest and fastest) as well as Bluetooth 4.2. It costs $17.95.
Optional 2: add a status LED and make the fan software-controllable (medium soldering experience, and electronics soldering equipment required)
- A 5mm multicolored LED (also known as an RGB LED) to indicate status of your server
- A breakable 0.1in male header with at least 29 pins
- A prototyping board with at least 24x6 through holes on a 0.1in grid
- A few resistors
- 4 transistors
- 4 short wires to connect the LED pins to the prototyping board. Short female patch cables are ideal.
To assemble the parts:
- Print the enclosure
- Attach the ESPRESSObin board and the disk to the enclosure with screws
- Connect the SATA data and power cables, and close the enclosure with the screws
- Install your operating system and applications
If you choose to install the fan, you also need to:
- Place the fan into the enclosure
- Plug the header into the ESPRESSObin’s header, and connect the fan’s power
If you choose to install WiFi and Bluetooth, you also need to:
- Insert the WiFi card into the socket on the ESPRESSObin
If you choose to add a status LED and make the fan software-controllable, you also need to:
- Assemble 4 single-transistor amplifiers and solder them to the prototyping board
- Solder headers to the prototyping board
- Insert the prototyping board’s header into the ESPRESSObin’s header
- Connect the fan’s power cord to the prototyping board’s header
- Connect the LED pins to the prototyping board’s header
We will go through those steps one by one.
Print the enclosure ^^^^^^^^^^^^^^^^^^^
Getting good 3D prints, or so it seems to us, depends on a special relationship between the 3D printer and the owner of the 3D printer. Use whatever magic you need to, but in general, here is what you need to do:
- Download the STL files for the enclosure. Note there are two versions: one version that has a hole for the 5mm status LED (in case you want to install it), and one that does not.
- IF you are not certain whether you will install the LED, download the one without the hole and use a drill to drill the hole after the fact if you need to.
- If you don’t trust your 3D printer to be particularly precise, it might be a good idea to not print the hole but to use a drill afterwards. (It’s no fun to expand a 5mm hole with a small file…)
- Run your favorite Slicer application that knows how to slice 3D models for your 3D printer. Use medium-quality settings, otherwise the print will probably take very long, and the enclosure doesn’t have to be that pretty, right?
- There are two parts that form the enclosure: one part holds the ESPRESSObin board and the other holds the disk. To close the enclosure, you screw them together. Both need to be printed separately, with the flat side (top or bottom, depending on which half of the box you are looking at) on your printer’s plate.
Attach the ESPRESSObin board and the disk to the enclosure with screws ^^^^^^^^^^^^^^^^^^^^^^^^^^^^^^^^^^^^^^^^^^^^^^^^^^^^^^^^^^^^^^^^^^^^^^
That’s very straightforward. Be gentle, of course: the ESPRESSObin board contains a few billion transistors, and your hard disk a few hundred billion magnets, and they do like to be respected :-)
Connect the SATA data and power cables and close the enclosure with the screws ^^^^^^^^^^^^^^^^^^^^^^^^^^^^^^^^^^^^^^^^^^^^^^^^^^^^^^^^^^^^^^^^^^^^^^^^^^^^^^
It might be a good idea to have the screws ready before you even start, because there is not a whole lot of room in the enclosure, and these cables might not want to behave. So once they do, quickly secure everything in place by screwing the enclosure shut.
You have assembled the hardware!
Install your operating system and applications ^^^^^^^^^^^^^^^^^^^^^^^^^^^^^^^^^^^^^^^^^^^^^^
Great hardware, but so far, pretty useless. We need software to run, and that means some version of Linux as the operating system, and then the app or apps that will serve your files, or whatever else you want your home server to do.
There are a number of choices for Linux distribution on the ESPRESSObin, including Ubuntu, Armbian, Yocto, and OpenWRT. Instructions for how to install those on the ESPRESSObin are provided by Globalscale.
We will continue this tutorial by installing UBOS, a Linux distro that is made specifically for easily running apps on a home server.
- On a PC, Mac or other computer, download the latest UBOS image from the UBOS website.
- Write that image to an SD Card
- Insert the SD card into the SD card slot of your ESPRESSObin
- Before you connect power, here’s the most clumsy part of the entire process: you need to do some unnatural acts to get the ESPRESSObin to boot from you